


13 skills

Signaling
5 minAim a signal mirror at an aircraft
A signal mirror is visible 20+ miles on a clear day — but only if you aim it.
- Hold the mirror close to your face and sight through the aiming hole (or over the top edge).
- Extend the other hand as a V with two fingers framing the aircraft.
- Tilt the mirror until the bright spot from the sunbeam lands on your fingers.
- Sweep across the aircraft repeatedly — a moving flash catches attention.
- Even without a proper mirror, use a phone screen, CD, or polished can lid the same way.
MNWoodland — How to Use a Signal Mirror
First Aid
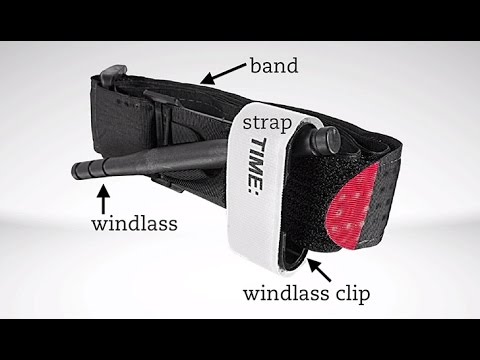
5 minStop severe bleeding
You have minutes. Direct pressure first, tourniquet if it doesn't stop.
- Press hard directly on the wound with any cloth — shirt, bandana, hand. Do not lift to look.
- Elevate the injury above the heart if possible.
- Hold pressure for at least 10 uninterrupted minutes.
- If blood soaks through, add material on top — do not remove the first layer.
- If bleeding won't stop on a limb, apply a tourniquet 2-3 in above the wound, tight enough that the bleeding stops. Note the time.
Warning: A properly applied tourniquet hurts. Once on, it stays on until a medical professional removes it.
American College of Surgeons — Tourniquet

Fire
15 minBank a fire to keep coals overnight
A properly banked fire holds live coals until morning, saving you a cold restart at dawn.
- Let the fire burn down until you have a solid bed of glowing coals — no active flame.
- Rake the coals into a compact pile in the center of the fire pit.
- Cover the coals with a 2–3 inch layer of dry ash, then a thin layer of dry soil or fine sand.
- Leave one small vent hole at the top so air can trickle in without the coals burning through the cover.
- In the morning, brush back the cover, add fine tinder to the exposed coals, and blow gently to raise a flame.
Tip: Hardwood coals bank far better than softwood. Save your best coals from oak, maple, or ash for the overnight pile.

Weather
5 minReduce your lightning risk in the field
You cannot make yourself lightning-proof, but you can dramatically reduce the odds of being struck.
- The moment you hear thunder, start moving off exposed terrain — ridges, summits, open meadows, and shorelines.
- Head to lower ground, ideally uniform terrain in a stand of shorter trees of similar height.
- Avoid isolated tall objects (single trees, poles, boulders taller than the surroundings).
- If you cannot reach shelter, spread your group so any strike affects only one person, and squat on the balls of your feet on a foam pad — never lie down.
- Wait 30 minutes after the last thunder before returning to exposed terrain.
Warning: Metal frame packs, trekking poles, and wet ropes conduct current. Set them aside 30 feet from you during a storm.

Field Skills
30 minLeave no trace of a fire
A properly disposed fire leaves the site indistinguishable from surrounding ground — good practice everywhere, not just in wilderness areas.
- Burn all wood to fine ash — no charred chunks remaining.
- Drown the ashes with water, stir, and drown again. Repeat until you can put your bare hand on the ash without any warmth.
- Scatter the cold wet ashes broadly outside the camp area — never in one heap.
- Return any rocks used for a ring to where you found them, dirty side down.
- Sweep the area with a branch to disguise scorch marks and lift compressed vegetation.
Warning: The single most common cause of wildfire is an incompletely drowned fire. If you can feel any warmth in the ashes, it's not out.
Field Skills
20 minCache food safely in bear country
In bear country, every scented item — food, toothpaste, sunscreen — must be secured away from your sleeping area.
- Use a certified bear canister where required, or an Ursack tied to a tree trunk.
- For hangs, find a branch at least 15 feet up and 4 feet out from the trunk, with the food bag suspended 5 feet below the branch.
- Use the counterbalance or PCT hang method so a bear cannot swat the bag down by yanking a rope.
- Store food, cooking gear, and any scented items at least 100 yards downwind from your tent.
- Never keep food, snack wrappers, or scented items in your tent, even in a pack.
Warning: A bear that gets a human food reward once will return, and that bear often ends up destroyed by wildlife officers. Bad food storage kills bears.
Field Skills
8 minTie a Trucker's Hitch for Mechanical Advantage
Learn to tie the Trucker's Hitch, a versatile knot that provides mechanical advantage for tightening lines. Essential for securing heavy loads, setting up ridge lines, or creating tension systems.
- Anchor one end of your rope to a fixed point, ensuring it's secure.
- Form a non-slip loop approximately one-third of the way from the working end of the rope.
- Pass the working end around the object you want to secure or the second anchor point.
- Thread the working end through the loop you created in step two.
- Pull the working end to create tension; this forms the 3:1 mechanical advantage.
- Secure the working end to the standing part of the rope with two half hitches, or another suitable friction hitch.
Tip: For extremely heavy loads or long-term setups, consider adding a second loop or a more robust friction hitch to prevent slippage.
Warning: Avoid using damaged or worn rope for critical applications.
Field Skills
10 minConstruct a Frame Saw from a Loose Blade and Green Willow Saplings
Learn to improvise a robust frame saw using only a spare blade, green wood, and cordage. This field expedient tool efficiently processes firewood.
- Select two straight, flexible saplings approximately 1.5 inches in diameter and two shorter, stiffer pieces for crosspieces.
- Cut notches into the ends of the two longer saplings to securely hold the saw blade's pins or holes.
- Drill or carve small holes near the ends of the longer saplings and the two shorter crosspieces for cordage.
- Insert the saw blade into the notches on the two long saplings, ensuring the teeth face the correct direction.
- Lash the two shorter crosspieces between the long saplings, creating a rectangular frame around the blade.
- Form a windlass by passing cordage around the two long saplings, then twist it with a strong stick until the blade is taut.
- Secure the windlass stick against the frame to prevent it from unwinding, maintaining blade tension.
Tip: When selecting your long saplings, choose green wood that is flexible enough to bow slightly under tension without splitting, but still strong enough to hold its shape. Willow and hazel are excellent choices for their resilience.
Warning: Improper tensioning can cause blade damage or unpredictable cutting.
Field Skills
10 minImprovise a Stretcher with Saplings and Jackets
Learn to quickly construct a rigid emergency stretcher using natural materials and jackets for backcountry patient transport when no other options exist.
- Locate and cut two straight, sturdy saplings, roughly 7-8 feet long and 1.5-2 inches in diameter.
- Lay the two saplings parallel on the ground, about 18-24 inches apart, with the wider end of each sapling facing the same direction.
- Invert two or more sturdy jackets and thread one sapling through both sleeves of each jacket.
- Position the jackets evenly spaced along the saplings, ensuring the main body of each jacket spans the gap between the poles.
- Button, zip, or tie the jackets securely around the saplings to create a taut, continuous bed.
- Test the stretcher's integrity by applying moderate weight before attempting to load a patient.
Tip: For added security and rigidity, especially with thinner jackets, thread a piece of cordage through the bottom hem of each jacket and tie it tightly to the saplings.
Warning: Avoid lifting patients with suspected spinal injuries without proper training and stabilization. This technique is a last resort.
Field Skills
8 minTie a Prusik Friction Hitch for Ascending
Master the Prusik hitch to safely ascend a fixed rope, a fundamental skill for self-rescue, climbing, and emergency access.
- Form a loop with your Prusik cord by tying its ends together with a double fisherman's knot, ensuring tails are trimmed.
- Place the Prusik loop behind the main rope, creating two strands parallel to the rope.
- Pass one side of the Prusik loop through the other side, around the main rope, making sure the bight wraps cleanly.
- Repeat this pass twice more, ensuring each wrap lays neatly beside the previous one without crossing or kinking.
- Dress the knot by gently tightening each wrap, ensuring they are snug and evenly spaced along the main rope.
- Test the hitch by applying weight to the loop: it should grip the main rope firmly.
- Release the hitch by sliding the wraps upwards, which should free it to move along the main line.
Tip: To prevent the Prusik from 'walking' (creeping upwards or downwards) when unweighted, ensure the wraps are snug but not overtightened.
Warning: Always use a Prusik cord with a significantly smaller diameter than the main rope to achieve effective friction.
Field Skills
10 minTreat Stage One Hypothermia with Active Re-Warming
Effectively treat mild hypothermia by applying external heat sources to the patient's core and insulating them from further heat loss.
- Assess the patient for signs of Stage One Hypothermia, including shivering, confusion, and impaired coordination.
- Remove all wet clothing and replace with dry layers, including headwear and gloves.
- Create a vapor barrier around the patient, such as a large plastic bag or emergency blanket, to trap body heat and block wind.
- Prepare safe heat sources, like water bottles filled with warm (not boiling) water, chemical heat packs, or heated rocks wrapped in multiple layers of cloth.
- Place prepared heat sources gently against the patient's torso, specifically in the armpits and groin areas.
- Insulate the patient further by adding more dry layers, a sleeping bag, or an emergency bivy over the vapor barrier.
- Continuously monitor the patient's mental status, shivering intensity, and overall comfort, adjusting heat sources as needed.
Tip: Always carry a dedicated emergency bivy or large plastic trash bag for its vapor barrier properties; it's a lightweight, high-impact item for cold emergencies.
Warning: Hypothermia can progress rapidly. If the patient's condition does not improve or worsens, assume severe hypothermia and seek immediate professional medical attention.
Field Skills
8 minTie a Taut-Line Hitch for High-Wind Tarp Guylines
Learn to reliably tension tarp guylines in windy conditions using only rope and a Taut-Line Hitch, ensuring your shelter remains secure.
- Anchor one end of your guyline to your tarp's tie-out point, then extend the line to your anchor point and wrap it around once.
- Form a loose loop with the working end of the rope, passing it under the standing part.
- Make two full wraps with the working end around the standing part inside this first loop, pulling them snug.
- Bring the working end back over the standing part and make one more wrap around the standing part, outside the initial two wraps, pulling it snug.
- Tighten the new knot by pulling on the working end, then slide the entire knot along the standing part to adjust tension.
- Secure the working end with a simple half hitch or stopper knot against the main knot for added security under extreme load.
Tip: When setting up in extreme wind, pre-tie your Taut-Line Hitch on the line near your tarp, then quickly secure the loose end to the anchor.
Warning: Improperly secured tarps can become dangerous projectiles in high winds.

Tools & Cordage
5 minTie a Bowline One-Handed for Rescue
Learn to reliably tie a bowline knot with one hand, a critical skill for emergency self-rescue or securing a line when one hand is occupied.
- Drape the working end of the rope over your dominant hand, palm up, with about 12-18 inches trailing towards your body.
- Form a small loop on the standing part of the rope, just above your hand, by rotating your wrist inward and letting the rope cross itself.
- Insert the working end of the rope from underneath, up through the center of this small loop.
- Wrap the working end around the standing part of the rope, going behind it and then up towards the small loop.
- Thread the working end back down through the original small loop from the top.
- Pull the standing part of the rope with your non-dominant hand (or bite if truly one-handed) while simultaneously pulling the working end to tighten the knot.
- Inspect the knot carefully to ensure the 'rabbit' goes around the 'tree' and back into its 'hole', forming a symmetrical, stable loop.
Tip: To simplify the one-handed action, use your teeth to hold the working end if your non-dominant hand is genuinely occupied or injured. This technique is for extreme emergencies.
Warning: Never use a poorly formed or improperly tightened bowline for critical applications.
Educational reference only. Wilderness conditions change fast — practice in low-stakes settings, take a certified wilderness first-aid course, and confirm regional regulations (fire, fishing, foraging, snaring) before you rely on any of these skills in the field.